Setting Margins In MS Word

MS Word Options for Preparing Documents

MS Word provides every option necessary for preparing any kind of literary document.
With the following options, there is no reason why your students cannot prepare
and turn in a perfectly formatted document. When setting your margins, you will want to start out with Page Layout and then Page Setup. Here are the options to choose from:

Home Insert Page Layout References Mailings Review View Acrobat

Clipboard
Font
Paragraph
Styles
Editing

Pages
Tables
Illustrations
Links
Header & Footer
Text
Symbols

Pa Themes
Arrow Pointing to  Page SetupPage Setup
Page Background
Paragraph
Arrange
Table of Contents
Footnotes
Citations & Bibiography
Captions
Index
Table of Authorities
Create
Start Mail Merge
Write & Insert Fields
Preview Results
Finish
Acrobat
Proofing
Comments
Tracking
Changes
Compare
Protect

Document Views
Show/Hide
Zoom
Window
Macros
Create Adobe PDF
Create & Email
Review & Comments


Audio Version


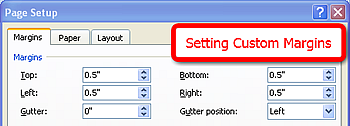
Setting margins is a simple process.
There are only 3 steps that are involved in this process and once doing it a few times, it will become automatic.

The steps for setting margins are:

Step 1. Click on "Page Layout".

Step 2. Click on " Page Setup".

Step 3. Click on "Margins".
A screen will come up with preset margins or you have the option of creating a custom margin for your document.

Step 4. Click on setting or create
a custom size and hit Okay".
Your margins will be automatically set.

Step 1
Step One With Arrow Pointing to Page Layout

Step 2
Step 2 With Arrow Pointing to Margins

Step 3 & 4
Standard & Custom Margins
Steps 3 and 4 Showing Window to Set Custom Margins

Learning Assessment